Tuesday, December 13, 2016

How to extend Python on Windows (Deep Learning Course on Udacity related)

I am recently learning Deep Learning from Udacity.

For 1_notmnist.ipynb, Problem 1: Let's take a peek at some of the data to make sure it looks sensible. Each exemplar should be an image of a character A through J rendered in a different font. Display a sample of the images that we just downloaded. Hint: you can use the package IPython.display.

One alternative way might be the following code:

import os, fnmatch

img_files = []

def all_img_files(img_files, search_path, pattern = '*.png'):
    for path, subdirs, files in os.walk(search_path):
        if files and fnmatch.fnmatch(files[0], pattern):
            img_files.append(os.path.join(path, files[0]))
            break;
                
for folder in train_folders:
    all_img_files(img_files, folder)
        

for folder in test_folders:
    all_img_files(img_files, folder)
      
for img in img_files:
    Image(filename = img)

However I found it's extremely slow, probably due to every sub-directories and files will be gathered on os.walk returning. the break statement has only a little affect on the whole processing time.

So I decide to write some code which genuinely fetches the first png file in each A-J directories respectively. Readers can follow the below linkage for reference on how the work can be down via VC++:

There's plenty of material on how to do that, namely write extension for Python, so the following is just source code without much explanation. I did it with Anaconda python 3.5 with Visual C++ 2015. Other platforms probably need some adjustment:

#include <Python.h>
#include <tchar.h> 
#include <stdio.h>
#include <strsafe.h>

#include <Windows.h>
#include <Shlwapi.h>


#include "deelx.h"

#pragma comment(lib, "python35.lib")
#pragma comment(lib, "User32.lib")
#pragma comment(lib, "Shlwapi.lib")

static PyObject *get_first_matched_file_error;

static PyObject* get_first_matched_file(PyObject* self, PyObject* args)
{
WIN32_FIND_DATA ffd;
TCHAR szDir[MAX_PATH];
HANDLE hFind = INVALID_HANDLE_VALUE;
DWORD dwError = 0;

int wchars_num;
char* directoryA;
wchar_t* directoryW;
char* patternA;
wchar_t* patternW;

if (!PyArg_ParseTuple(args, "sz", &directoryA, &patternA))
return NULL;

wchars_num = MultiByteToWideChar(CP_UTF8, 0, directoryA, -1, NULL, 0);
directoryW = new wchar_t[wchars_num];
MultiByteToWideChar(CP_UTF8, 0, directoryA, -1, directoryW, wchars_num);

if (!PathFileExists(directoryW))
{
PyErr_SetString(get_first_matched_file_error, "Non-existing directory");
delete[] directoryW;
return NULL;
}

// Prepare string for use with FindFile functions.  First, copy the
// string to a buffer, then append '\*' to the directory name.

StringCchCopy(szDir, MAX_PATH, directoryW);
delete[] directoryW;
StringCchCat(szDir, MAX_PATH, TEXT("\\*"));

wchars_num = MultiByteToWideChar(CP_UTF8, 0, patternA, -1, NULL, 0);
patternW = new wchar_t[wchars_num];
MultiByteToWideChar(CP_UTF8, 0, patternA, -1, patternW, wchars_num);

CRegexpT <wchar_t> regexp(patternW);

// Find the first file in the directory.

hFind = FindFirstFile(szDir, &ffd);

if (INVALID_HANDLE_VALUE == hFind)
{
delete[] patternW;
PyErr_SetString(get_first_matched_file_error, "Cannot open directory");
return NULL;
}

PyObject * pyFileName = NULL;
// List all the files in the directory with some info about them.
do
{
if (ffd.dwFileAttributes & FILE_ATTRIBUTE_DIRECTORY)
{
continue;
}
else
{
MatchResult result = regexp.Match(ffd.cFileName);
if (result.IsMatched())
{
char* cFileName;
int chars_num;

chars_num = WideCharToMultiByte(CP_UTF8, 0, ffd.cFileName, -1, NULL, 0, NULL, NULL);
cFileName = new char[chars_num];
WideCharToMultiByte(CP_UTF8, 0, ffd.cFileName, -1, cFileName, chars_num, NULL, NULL);

pyFileName = Py_BuildValue("s", cFileName);
delete[] cFileName;

break;
}
}
} while (FindNextFile(hFind, &ffd) != 0);

if (GetLastError() == ERROR_NO_MORE_FILES)
pyFileName = Py_BuildValue("s", "");

FindClose(hFind);
delete[] patternW;

return pyFileName;
}

static PyMethodDef get_first_matched_file_method[] = {
{
"get_first_matched_file",  get_first_matched_file,
METH_VARARGS, "Get the first file given directory and pattern"
},

{NULL, NULL, 0, NULL}        /* Sentinel */
};

static struct PyModuleDef get_first_matched_file_module =
{
PyModuleDef_HEAD_INIT,
"get_first_matched_file", /* name of module */
"Get the first file given directory and pattern",          /* module documentation, may be NULL */
-1,          /* size of per-interpreter state of the module, or -1 if the module keeps state in global variables. */
get_first_matched_file_method
};

PyMODINIT_FUNC PyInit_get_first_matched_file(void)
{
PyObject *m = PyModule_Create(&get_first_matched_file_module);
if (m == NULL)
return NULL;

get_first_matched_file_error = PyErr_NewException("get_first_matched_file.error", NULL, NULL);
Py_INCREF(get_first_matched_file_error);
PyModule_AddObject(m, "error", get_first_matched_file_error);

return m;
}


There's only one dependency, namely deelx.h, referring to the websites below:

A testing script is as follows:

import sys
sys.path.append("C:\\Users\\MS User\\Documents\\Visual Studio 2015\\Projects\\PythonExtensions\\x64\\Release")

import get_first_matched_file

directory = "C:\\tensorflow\\tensorflow\\examples\\udacity\\notMNIST_large\\B"
pattern = "\\.png$"

file = get_first_matched_file.get_first_matched_file(directory, pattern)
print(file)

Enjoy python, enjoy learning from Udacity.

Project setting:

How to change serving directory of Jupyter on Windows

Sometimes it's convenient altering the default directory which Jupyter serving from. For example, I prefer it serving from C:\tensorflow\tensorflow\examples\udacity since I git clone everything there.

First run the following command to generate the configuration file nammed jupyter_notebook_config.py, usually it resides in the .jupyter folder in your home directory:
jupyter notebook --generate-config


Now open the file and search the following line:
#c.NotebookApp.notebook_dir = ''

Uncomment it, put the target directory into the semicolon. Since on Windows platform, so we need to escape the backslash character:
c.NotebookApp.notebook_dir = 'C:\\tensorflow\\tensorflow\\examples\\udacity'

Final result:


Tuesday, December 6, 2016

How to use Anaconda

Anaconda is a one stop distribution of Python related scientific computing components. Probably its convenience is more obvious on Windows instead of Linux. Following is some summary of how to use conda on Windows platform.
To avoid anything unexpected happened, suggest to start Anaconda by choosing from start menu and launch the Anaconda Prompt.

1. Show all virtual environments created:
conda info --envs

2. Activate specific environment, like root:
activate root

3. Deactive specific environment, like root:
deactivate
There’s no need to append the option value since the command is aware of which environment it's currently in.
However, try not to deactivate the default root environment, since on *nix platform, it will try to remove Anaconda path variable from current shell environment variable. What you need to do is just switch to another virtual environment, and conda is clever enough to deactivate the previous one.

4. Create specified environment (here take “default” as an example) and initially with specified lib to be installed (here take “matplotlib” as an example):
conda create -n default matplotlib 

5. Create specified environment (for instance “default”) by clone another (here root)
conda create -n default --clone root

6. List the packages installed into specified environment (for instance “default”):
conda list -n default

7. Install package (here with option value “tensorflow”) into the current environment:
conda install tensorflow

8. Install package (as an example, “tensorflow”) into the specified environment (here with name root):
conda install -n root tensorflow

9. Search uncommon package in Anaconda website:
anaconda search -t conda package-name 

10. Show detail about found package
anaconda show user/package-name

11. Install specific package from specified channel:
conda install --channel https://conda.anaconda.org/user package-name

12. Install specific package (like tensorflow) with pip (it’s recommended to do in some virtual environment) by virtue of auto-resolving dependency:
pip instll tensorflow

Thursday, November 24, 2016

Lesson learnt from twiddling Mandlebrot Fractals with TensorFlow

I don't know it should be called a real lesson since I am recently exposed to TensorFlow. Since I guess my later work involves visualization of massive data, so I prefer things can be done on Windows (Just my preference to the old Windows API). So the first time I read the Mandelbrot example in the book "Get started with TensorFlow", I wondered could I visualize the process in Windows. So I did a slight modification of the example, as follows:

import numpy as np
import tensorflow as tf
import matplotlib.pyplot as plt

Y, X = np.mgrid[-1.3:1.3:0.005, -2:1:0.005] 

Z = X + 1j*Y
c = tf.constant(Z.astype(np.complex64))

zs = tf.Variable(c)
ns = tf.Variable(tf.zeros_like(c, tf.float32))

zs_square = tf.pow(zs, 2)
zs_final = tf.add(zs_square, c)

not_diverged = tf.complex_abs(zs_final) < 4

update = tf.group(zs.assign(zs_final), ns.assign_add(tf.cast(not_diverged, tf.float32)), name = "update")
output = tf.identity(ns, name="output")

saver = tf.train.Saver()

sess = tf.Session()
sess.run(tf.initialize_all_variables())

#tf.assign(zs, sess.run(zs))
#tf.assign(ns, sess.run(ns))

tf.train.write_graph(sess.graph_def, "models/", "graph.pb", as_text = True)

saver.save(sess, "models/model.ckpt")

for i in range(200):
    sess.run(update)

plt.imshow(sess.run(ns))
plt.show()

sess.close()


And it got the wonderful Mandelbrot fractal:

In order to appreciate the whole process generating the Mandelbrot fractal, I wonder possible I freeze the model, load it under Windows. For each step, I run the "update" node, then fetch the result via "output" node.

However, it's not applicable since when freezing, the variables will be substituted with constants, and it cannot be later updated again. See the following complain:


I think it's quite understandable, because the intention of TensorFlow is to let the trained model run as quickly as possible, so no surprise that variables are eliminated finally.

If we uncomment the following lines and save the graph as binary:
tf.assign(zs, sess.run(zs))
tf.assign(ns, sess.run(ns))

tf.train.write_graph(sess.graph_def, "models/", "graph.pb", as_text = False)

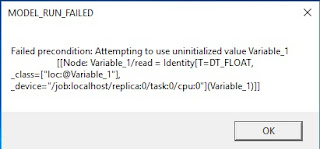
The fact is it seems the variable didn't get initialized if we explicitly do it in the program:


I am still working on it, but log it here in reminding someone who's applying TensorFlow to the scenario that requires no explicit input, please rethink about it.


Thursday, November 10, 2016

Handwritten digits recognition via TensorFlow based on Windows MFC (V) - Result demo

The final finised project named DigitRecognizer developed under Visual Studio 2015, referring to the following video for an demonstration.


However, still a long way to go to master TensorFlow.

Thanks for the guys at Google for developing TensorFlow, however support of bazel on Windows still need more improvements.

Thanks guys at Microsoft for developing Visual Studio, which always cease the pain for development on Windows.

Thanks guys make and still bread Machine Learning, will always need to learn from you and to show my appreciations.

Happy learning, happy coding!

Handwritten digits recognition via TensorFlow based on Windows MFC (IV) - Load trained model

I think two good article have detailed everything, thanks a lot to their efforts:
https://medium.com/jim-fleming/loading-a-tensorflow-graph-with-the-c-api-4caaff88463f#.t78tjznzu, by Jim Fleming; http://jackytung8085.blogspot.kr/2016/06/loading-tensorflow-graph-with-c-api-by.html by Jacky Tung.

So I directly paste the code here for reference:

MnistModel.cc:

#include<Windows.h>

#include <stdio.h>

#include <vector>
#include <string>
#include <sstream>
#include <iostream>
#include <utility>

#include "tensorflow/core/public/session.h"
#include "tensorflow/core/platform/env.h"

#include "MNistComm.h"

using std::vector;
using std::string;
using std::ostringstream;
using std::endl;
using std::pair;

using namespace tensorflow;

void fillErrMsg(MNIST_COMM_ERROR *err, MNIST_ERROR_CODE c, Status& status)
{
    memset(err, 0, sizeof(MNIST_COMM_ERROR));
        
    err->err = c;
        
    ostringstream ost;
    ost << status.ToString() << endl;
        
    snprintf(err->msg, MAX_MSG_SIZ, "%s", ost.str().c_str());
}

// Windows are Unicode supportted, so everything is natively Unicode
int wmain(wchar_t* argc, wchar_t* argv[])
{    
    // Open file mapping object
    MnistShm mnistShm(false);
    if (!mnistShm)
        return MNIST_OPEN_SHM_FAILED;        
   
    MnistEvent mnistEvent(false);
    if (!mnistEvent)
        return MNIST_OPEN_EVT_FAILED;

    Session* session = NULL;
    Status status = NewSession(SessionOptions(), &session);
    if(!status.ok())
    {
        MNIST_COMM_ERROR err;
        fillErrMsg(&err, MNIST_SESSION_CREATION_FAILED, status);
        mnistShm.SetError(reinterpret_cast<char*>(&err));
        
        return MNIST_SESSION_CREATION_FAILED;
    }
        
    char modelPath[MAX_PATH];
    CMnistComm::WChar2Char(modelPath, argv[1], MAX_PATH - 1);
    
    GraphDef graph_def;    
    status = ReadBinaryProto(Env::Default(), modelPath, &graph_def);
    if (!status.ok())
    {        
        MNIST_COMM_ERROR err;
        fillErrMsg(&err, MNIST_MODEL_LOAD_FAILED, status);
        mnistShm.SetError(reinterpret_cast<char*>(&err));

        return MNIST_MODEL_LOAD_FAILED;
    }
    
    status = session->Create(graph_def);
    if (!status.ok()) {

        MNIST_COMM_ERROR err;
        fillErrMsg(&err, MNIST_GRAPH_CREATION_FAILED, status);
        mnistShm.SetError(reinterpret_cast<char*>(&err));

        return MNIST_GRAPH_CREATION_FAILED;
    }
    
    // Setup inputs and outputs:
    Tensor img(DT_FLOAT, TensorShape({1, MNIST_IMG_DIM}));

    MNIST_COMM_EVENT evt;
    
    while (evt = mnistEvent.WaitForEvent(MNIST_EVENT_PROC))
    {        
        auto buf = img.flat<float>().data();
    
        mnistShm.GetImageData(reinterpret_cast<char*>(buf));

        vector<pair<string, Tensor>> inputs = {
            { "input", img}
        };
        
        // The session will initialize the outputs
        vector<Tensor> outputs;
        // Run the session, evaluating our "logits" operation from the graph
        status = session->Run(inputs, {"recognize"}, {}, &outputs);
        if (!status.ok()) {
            MNIST_COMM_ERROR err;
            fillErrMsg(&err, MNIST_MODEL_RUN_FAILED, status);
            mnistShm.SetError(reinterpret_cast<char*>(&err));
            
            return MNIST_MODEL_RUN_FAILED;
        }
        
        auto weights = outputs[0].shaped<float, 1>({10});
        int index = 0;
        int digit = -1;
        
        float min_ = 0.0;
        for (int i = 0; i < 10; i ++, index ++)
        {
            if (weights(i) > min_)
            {
                min_ = weights(i);
                digit = index;
            }
        }
                
        mnistShm.SetImageLabel(reinterpret_cast<char*>(&digit));
        mnistEvent.NotifyReady();
                
    }

    session->Close();
    
    return 0;
}


Handwritten digits recognition via TensorFlow based on Windows MFC (III) - Inter-process Communication framework (II)

MnistComm.h:

#pragma once

#include <Windows.h>
#include <stdio.h>
#include <conio.h>
#include <tchar.h>
#include <stddef.h>

#include <map>
#include <string>

using std::map;
using std::string;

// Data structure definitions
typedef enum tagMNIST_ERROR_CODE
{
MNIST_OK = 0,
MNIST_CREATE_SHM_FAILED = 1,
MNIST_OPEN_SHM_FAILED = 2,
MNIST_CREATE_EVT_FAILED = 3,
MNIST_OPEN_EVT_FAILED = 4,

MNIST_SESSION_CREATION_FAILED = 10,
MNIST_MODEL_LOAD_FAILED = 11,
    MNIST_GRAPH_CREATION_FAILED = 12,
MNIST_MODEL_RUN_FAILED = 13,

} MNIST_ERROR_CODE;

#define MAX_MSG_SIZ 255

typedef struct tagMNIST_COMM_ERROR
{
MNIST_ERROR_CODE err;
char msg[MAX_MSG_SIZ + 1];
} MNIST_COMM_ERROR;


#define MNIST_IMG_HEIGHT 28
#define MNIST_IMG_WIDTH 28
#define MNIST_IMG_DIM (MNIST_IMG_HEIGHT * MNIST_IMG_WIDTH)
#define MNIST_IMG_SIZ (MNIST_IMG_DIM * sizeof(float))
typedef struct tagMNIST_IMG_LABEL
{
float img[MNIST_IMG_HEIGHT][MNIST_IMG_WIDTH];
int label;
} MNIST_IMG_LABEL;

typedef struct tagMNIST_COMM_SHM_LAYOUT
{
MNIST_COMM_ERROR mnist_err;
MNIST_IMG_LABEL mnist_data;
} MNIST_COMM_SHM_LAYOUT;

class MnistShm
{
public:
MnistShm(bool host);
~MnistShm();

bool operator !()
{
return !m_bInitialized;
}

bool GetError(char* pBuf)
{
CopyMemory(pBuf, m_pBuf + offsetof(MNIST_COMM_SHM_LAYOUT, mnist_err), sizeof(MNIST_COMM_ERROR));
return true;
}

bool SetError(char* pBuf)
{
CopyMemory(m_pBuf + offsetof(MNIST_COMM_SHM_LAYOUT, mnist_err), pBuf, sizeof(MNIST_COMM_ERROR));
return true;
}

bool GetImageData(char* pBuf)
{
CopyMemory(pBuf, m_pBuf + offsetof(MNIST_COMM_SHM_LAYOUT, mnist_data), MNIST_IMG_SIZ);
return true;
}

bool SetImageData(char* pBuf)
{
CopyMemory(m_pBuf + offsetof(MNIST_COMM_SHM_LAYOUT, mnist_data), pBuf, MNIST_IMG_SIZ);
return true;
}

bool GetImageLabel(char* pBuf)
{
CopyMemory(pBuf, m_pBuf + offsetof(MNIST_COMM_SHM_LAYOUT, mnist_data) + MNIST_IMG_SIZ, sizeof(int));
return true;
}

bool SetImageLabel(char* pBuf)
{
CopyMemory(m_pBuf + offsetof(MNIST_COMM_SHM_LAYOUT, mnist_data) + MNIST_IMG_SIZ,
pBuf, sizeof(int));
return true;
}


private:
static wchar_t* MnistShmName;

bool m_bInitialized;
HANDLE m_hMapFile;
char* m_pBuf;
};

typedef enum tagMNIST_COMM_EVENT
{
MNIST_EVENT_NULL = -1,
MNIST_EVENT_QUIT = 0,
MNIST_EVENT_PROC = 1,
MNIST_EVENT_REDY = 2,
MNIST_EVENT_COUNT = 3,
} MNIST_COMM_EVENT;

typedef struct tagMNIST_EVENT_NAME
{
MNIST_COMM_EVENT e;
wchar_t* name;
} MNIST_EVENT_NAME;

typedef HANDLE MNIST_EVENT_HANDLE[MNIST_EVENT_COUNT];

class MnistEvent
{
public:
MnistEvent(bool host);
~MnistEvent();

bool operator !()
{
return !m_bInitialized;
}

bool NotifyQuit()
{
return PulseEvent(m_hEvt[MNIST_EVENT_QUIT]);
}

bool NotifyProc()
{
return PulseEvent(m_hEvt[MNIST_EVENT_PROC]);
}

bool NotifyReady()
{
return PulseEvent(m_hEvt[MNIST_EVENT_REDY]);
}

MNIST_COMM_EVENT WaitForEvent(MNIST_COMM_EVENT event)
{
DWORD dwEvent;
MNIST_COMM_EVENT e;

do
{
dwEvent = WaitForMultipleObjects(MNIST_EVENT_COUNT, m_hEvt, FALSE, INFINITE);
e = static_cast<MNIST_COMM_EVENT>(dwEvent - WAIT_OBJECT_0);
if (e == event)
break;
} while (e != MNIST_EVENT_QUIT);

return e;
}

private:
static MNIST_EVENT_NAME MnistEventName[MNIST_EVENT_COUNT];

bool m_bHost;
bool m_bInitialized;
MNIST_EVENT_HANDLE m_hEvt;
};


class CMnistComm
{
public:
CMnistComm();
~CMnistComm();

static bool Char2WChar(char* cs, wchar_t* wcs, int size)
{
return swprintf(wcs, size, L"%S", cs);
}

static bool WChar2Char(char* cs, wchar_t* wcs, int size)
{
return snprintf(cs, size, "%S", wcs);
}

};


MnistComm.cpp:

#include "MnistComm.h"

wchar_t* MnistShm::MnistShmName = _T("MnistSharedMemory");

MnistShm::MnistShm(bool host) : m_bInitialized(false), m_hMapFile(NULL)
{
if (host)
m_hMapFile = CreateFileMapping(INVALID_HANDLE_VALUE, NULL, PAGE_READWRITE,
0, sizeof(MNIST_COMM_SHM_LAYOUT), MnistShmName);
else
m_hMapFile = OpenFileMapping(FILE_MAP_ALL_ACCESS, FALSE, MnistShmName);

if (m_hMapFile == NULL)
{
OutputDebugString(host ? TEXT("Could not create file mapping object") :
TEXT("Could not open file mapping object"));
return;
}

m_pBuf = reinterpret_cast<char*>(MapViewOfFile(m_hMapFile, FILE_MAP_ALL_ACCESS, 0, 0, sizeof(MNIST_COMM_SHM_LAYOUT)));
if (m_pBuf == NULL)
{
OutputDebugString(TEXT("Could not map view of file"));
return;
}

m_bInitialized = true;
}

MnistShm::~MnistShm()
{
if (m_pBuf)
UnmapViewOfFile(m_pBuf);
if (m_hMapFile)
CloseHandle(m_hMapFile);
}

MNIST_EVENT_NAME MnistEvent::MnistEventName[] =
{
{ MNIST_EVENT_QUIT, TEXT("MnistEventQuit") },
{ MNIST_EVENT_PROC, TEXT("MnistEventProc") },
{ MNIST_EVENT_REDY, TEXT("MnistEventRedy") },
};

MnistEvent::MnistEvent(bool host) :
m_bHost(host),
m_bInitialized(false),
m_hEvt{ 0 }
{
if (host)
{
m_hEvt[MNIST_EVENT_QUIT] = CreateEvent(NULL, TRUE, FALSE, MnistEventName[MNIST_EVENT_QUIT].name);
m_hEvt[MNIST_EVENT_PROC] = CreateEvent(NULL, TRUE, FALSE, MnistEventName[MNIST_EVENT_PROC].name);
m_hEvt[MNIST_EVENT_REDY] = CreateEvent(NULL, TRUE, FALSE, MnistEventName[MNIST_EVENT_REDY].name);
}
else
{
m_hEvt[MNIST_EVENT_QUIT] = OpenEvent(EVENT_ALL_ACCESS, FALSE, MnistEventName[MNIST_EVENT_QUIT].name);
m_hEvt[MNIST_EVENT_PROC] = OpenEvent(EVENT_ALL_ACCESS, FALSE, MnistEventName[MNIST_EVENT_PROC].name);
m_hEvt[MNIST_EVENT_REDY] = OpenEvent(EVENT_ALL_ACCESS, FALSE, MnistEventName[MNIST_EVENT_REDY].name);

}

if (m_hEvt[MNIST_EVENT_QUIT] == NULL)
{
OutputDebugString(host ? TEXT("Could not create quit event object") :
TEXT("Could not open quit event object"));
return;
}

if (m_hEvt[MNIST_EVENT_PROC] == NULL)
{
OutputDebugString(host ? TEXT("Could not create processing event object") :
TEXT("Could not open processing event object"));
return;
}

if (m_hEvt[MNIST_EVENT_REDY] == NULL)
{
OutputDebugString(host ? TEXT("Could not create ready event object") :
TEXT("Could not open ready event object"));
return;
}

m_bInitialized = true;
}

MnistEvent::~MnistEvent()
{
if (m_hEvt[MNIST_EVENT_QUIT])
CloseHandle(m_hEvt[MNIST_EVENT_QUIT]);

if (m_hEvt[MNIST_EVENT_PROC])
CloseHandle(m_hEvt[MNIST_EVENT_PROC]);

if (m_hEvt[MNIST_EVENT_REDY])
CloseHandle(m_hEvt[MNIST_EVENT_REDY]);

}


CMnistComm::CMnistComm()
{
}


CMnistComm::~CMnistComm()
{
}


Handwritten digits recognition via TensorFlow based on Windows MFC (III) - Inter-process Communication framework (I)

As I mentioned in the first post, it's planned to have the inference run as a standalone process, so we feed it with image data and obtain the predicted result. We need some Inter-communication framework to do so. (I later realize probably DLL is enough, so I maybe fallback to DLL someday).

All things are done under Windows, please follow me patiently.

First as suggested by official tutorial of bazel and tensorflow, create a folder named tools under root directory like C:\ and install bazel there. Also some dependency like swigwin.


Second git clone tensorflow source code from github.

Third, under the directory C:\tensorflow\tensorflow\cc, create folder mnist. all of our work goes into this folder.

To utilize inter-process communication, I create two files MnistComm.h and MnistComm.cpp, I will paste the content in the next post. I also create another file MnistModel.cc to load the model and run inference.

Fourth, let's create files related to the build process.

1. BUILD file:
# Description:
# TensorFlow is a computational framework, primarily for use in machine
# learning applications.

package(
    default_visibility = ["//visibility:public"],
)

licenses(["notice"])  # Apache 2.0

exports_files(["LICENSE"])

load(":mnist.bzl", "mnist_copts")

cc_library(
    name = "MnistComm",
    srcs = ["MnistComm.cpp"],
    hdrs = ["MnistComm.h"],
    copts = ["/Zc:wchar_t", "/D_UNICODE", "/DUNICODE"],
    linkopts = [],
    deps = [
    ],
)

cc_binary(
    name = "MnistModel",
    srcs = ["MnistModel.cc"],
    copts = mnist_copts(["/Zc:wchar_t", "/D_UNICODE", "/DUNICODE"]),
    deps = [
        ":MnistComm",
        "//tensorflow/core:tensorflow",
    ],
)

2. a tiny extension file named mnist.bzl:


def mnist_copts(fs):
    cflags = fs + ["-DEIGEN_AVOID_STL_ARRAY",
        "-Iexternal/gemmlowp",
        "-Wno-sign-compare",
        "-fno-exceptions"] + \
        select({
            "//tensorflow:windows": [
                "/DLANG_CXX11",
                "/D__VERSION__=\\\"MSVC\\\"",
            ],
            "//conditions:default": ["-pthread"]})
    
    return cflags

Then how to build these targets?

1. Open the msys2 console, set the environment variables:
cd c:/tensorflow
export JAVA_HOME="$(ls -d C:/Program\ Files/Java/jdk* | sort | tail -n 1)"
export BAZEL_SH=c:/tools/msys64/usr/bin/bash.exe
export BAZEL_VS="C:/Program Files (x86)/Microsoft Visual Studio 14.0"
export BAZEL_PYTHON="C:/Program Files/Python35/python.exe"
export PATH=$PATH:/c/tools/swigwin-3.0.10:/c/tools/bazel:/c/Program\ Files/Python35

Adjust these variables properly.

2. Configure and build:
./configure

bazel build -c opt --cpu=x64_windows_msvc --host_cpu=x64_windows_msvc //tensorflow/cc/mnist:MnistComm --verbose_failures

bazel build -c opt --cpu=x64_windows_msvc --host_cpu=x64_windows_msvc //tensorflow/cc/mnist:MnistModel --verbose_failures


Handwritten digits recognition via TensorFlow based on Windows MFC (II) - Train the MNist model

Now let's approach the second episode of this series.
Now we will train the MNist model and later load it to do prediction.

WARNING: The record surrounded by asterisks below is the first try of my work, however, due to poor recording during the process, I don't remember it's workable or not, I just log here for my reference. Please safely neglected it, directly jump to the lines below the second asterisk line


****************
For simplicity, it will directly utilize the existing one, namely fully_connected_feed.py, to obtain such a model.

First clone the tensorflow source code from github.
Since the master branch has some problem with regards running fully_connected_feed.py, so we have to rebase the branch to the stable r0.11 branch:
git checkout r0.11
Then check everything ok:
git status

Second make a copy of the original fully_connected_feed.py, since we have no intention to contaminate the original one:
cp  fully_connected_feed.py fully_connected_feed2.py

Third add an named op under the default graph clause:
    # Create the recognizer
    digit = tf.argmax(tf.nn.softmax(logits), 1, name = 'recognize')

The fourth step is to get rid of the intermediate checkpoint files, so the condition becomes:
      if (step + 1) == FLAGS.max_steps:
        checkpoint_file = os.path.join(FLAGS.train_dir, 'checkpoint')
        saver.save(sess, checkpoint_file, global_step=step)

The fifth step is to save the model:
    tf.train.write_graph(sess.graph_def, 'models/', 'mnist-mlp.pb')


And the last step is to get rid of reluctant things:
python /opt/tensorflow/tensorflow/python/tools/freeze_graph.py  --input_checkpoint=data/checkpoint-1999 --input_graph=models/mnist-mlp.pb --output_graph=models/frozenn-mnist-mlp.pb --output_node_names=recognize

Now we have the model file prepared.
****************


For the model preparation process, I highly referred to the post by Jacky Tung, the address is http://jackytung8085.blogspot.kr/2016/06/loading-tensorflow-graph-with-c-api-by.html.

I git cloned everything of his work on github, done the model based on the existing work. It's quite easy to follow, so I just mention something tricky.

1. First it probably complains the some file doesn't exist, it's due to recursively creating file, so first create a directory named "models" under the mnist.py script directory.
Or speaking alternatively, when creating some file like foo/bar, the "-p" option may be mandatory for some OS.

2. When reducing the file, probably the freeze_graph script will complain the checkpoint file doesn't exist, I guess freeze_graph probably assume cwd is where it resides, so passing the absolute path for model file and checkpoint file

3. It seems when doing inference, tf.argmax can further reduce the work of retrieving result, however, I guess since it doesn't associate with an obvious derivative, so it seems freeze_graph strips it from the file model file, even if you add it in the graph. So probably we have to analyze the result returned by softmax manually.

4. Since freeze_graph is a python script, seems it prefers that graph and checkpoint files are all in text format, if you save them as binaries, probably it will complains decoding fault.

Welcome further discussion.

Keep learning, keep tweaking!

Monday, October 31, 2016

Handwritten digits recognition via TensorFlow based on Windows MFC (I) - Load MNist image data

I would like to write a series of posts on how to utilize TensorFlow doing handwritten digit recognition on Windows based on MFC application. The procedures will be first trained a model based on Linux system such Ubuntu, then export the data of the model to Windows. Then try to build an application which can load the model. The application based on MFC will acts as front-end role, sending the image to the application hosting the model, and retrieve the recognized result.

In this posts, I will focus on how to load MNist image data. Please referring to the following linkage for details:
http://yann.lecun.com/exdb/mnist/

I only past the source code here without further explanation, please note I just test the code in VC++ 2015, so I am not sure it's workable under other VC versions:

Header file:

#pragma once

#include <Windows.h>

#define MNIST_MAGIC_IMAGE 0x00000803
#define MNIST_MAGIC_LABEL 0x00000801

#define IMAGE_HEIGHT 28
#define IMAGE_WIDTH 28
#define LABEL_SIZE 1

typedef enum tagMNIST_TYPE
{
IMAGE = 0,
LABEL = 1,
} MNIST_TYPE;

#pragma pack(push, 1)
typedef struct tagMNIST_IMAGE
{
int magic;
int items;
int rows;
int cols;
unsigned char* data;
} MNIST_IMAGE;

typedef struct tagMNIST_LABEL
{
int magic;
int items;
unsigned char* label;
} MNIST_LABEL;

#pragma pack(pop)

typedef unsigned char IMAGE_DATA[IMAGE_HEIGHT][IMAGE_WIDTH];
typedef unsigned char LABEL_DATA[LABEL_SIZE];

class CMnistReader
{
public:
CMnistReader(LPCTSTR path, MNIST_TYPE type = IMAGE);
~CMnistReader();

bool operator !()
{
return !m_bInit;
}

bool GetNextImage(IMAGE_DATA img);
bool GetNextLabel(LABEL_DATA lb);

bool GetPrevImage(IMAGE_DATA img);
bool GetPrevLabel(LABEL_DATA lb);

bool GetImage(IMAGE_DATA img, int idx);
bool GetLabel(LABEL_DATA lb, int idx);

private:
MNIST_TYPE m_type;
bool m_bInit;
HANDLE m_hFile;
HANDLE m_hMapFile;
DWORD m_dwFileSize;
unsigned char* m_lpMapAddress;
unsigned char* m_lpCurAddress;
union {
MNIST_IMAGE m_image;
MNIST_LABEL m_label;
};

};

class CBitmapConverter
{
public:
CBitmapConverter(HDC hdc);
~CBitmapConverter();

bool Convert(IMAGE_DATA data);
HBITMAP GetBmpHandle() { return m_hBitmap; }

private:
HBITMAP m_hBitmap;
unsigned char* m_lpBitmapBits;
};


Source Files:

#include "stdafx.h"

#include <WinSock2.h>
#include "MnistReader.h"

#pragma comment(lib, "Ws2_32.lib")

CMnistReader::CMnistReader(LPCTSTR path, MNIST_TYPE type) :
m_type(type),
m_bInit(false),
m_hFile(INVALID_HANDLE_VALUE),
m_hMapFile(NULL),
m_lpMapAddress(NULL)
{
m_hFile = CreateFile(path, GENERIC_READ, 0, NULL, OPEN_EXISTING,
FILE_ATTRIBUTE_NORMAL, NULL);

if (m_hFile == INVALID_HANDLE_VALUE)
{
OutputDebugString(_T("CreateFile() Failed"));
return;
}

m_dwFileSize = GetFileSize(m_hFile, NULL);
if (type == IMAGE && m_dwFileSize < sizeof(m_image) ||
type == LABEL && m_dwFileSize < sizeof(m_label))
{
OutputDebugString(_T("Invalid File Size"));
return;
}

m_hMapFile = CreateFileMapping(m_hFile, NULL, PAGE_READONLY,
0, m_dwFileSize,  NULL);

if (m_hMapFile == NULL)
{
OutputDebugString(_T("CreateFileMapping() Failed"));
return;
}

m_lpMapAddress = (unsigned char*)MapViewOfFile(m_hMapFile, FILE_MAP_READ, 0, 0, m_dwFileSize);

if (m_lpMapAddress == NULL)
{
OutputDebugString(_T("MapViewOfFile() Failed"));
return;
}

switch (type)
{
case IMAGE:
memcpy(&m_image, m_lpMapAddress, sizeof(MNIST_IMAGE));
m_image.magic = htonl(m_image.magic);
m_image.items = htonl(m_image.items);
m_image.rows = htonl(m_image.rows);
m_image.cols = htonl(m_image.cols);
m_lpCurAddress = m_lpMapAddress + offsetof(MNIST_IMAGE, data);

if (m_image.magic != MNIST_MAGIC_IMAGE)
{
OutputDebugString(_T("Invalid Image File Format"));
return;
}
break;
case LABEL:
memcpy(&m_label, m_lpMapAddress, sizeof(MNIST_LABEL));
m_label.magic = htonl(m_label.magic);
m_label.items = htonl(m_label.items);
m_lpCurAddress = m_lpMapAddress + offsetof(MNIST_LABEL, label);

if (m_label.magic != MNIST_MAGIC_LABEL)
{
OutputDebugString(_T("Invalid Image File Format"));
return;
}
break;
}

m_bInit = true;
}


CMnistReader::~CMnistReader()
{
if (m_lpMapAddress)
UnmapViewOfFile(m_lpMapAddress);
if (m_hMapFile)
CloseHandle(m_hMapFile);
if(m_hFile != INVALID_HANDLE_VALUE)
CloseHandle(m_hFile);
}

bool CMnistReader::GetNextImage(IMAGE_DATA img)
{
if (m_type == IMAGE &&
(m_lpMapAddress + m_dwFileSize - m_lpCurAddress) >= sizeof(IMAGE_DATA))
{
memcpy(img, m_lpCurAddress, sizeof(IMAGE_DATA));
m_lpCurAddress += sizeof(IMAGE_DATA);
return true;
}
else
{
memset(img, 0, sizeof(IMAGE_DATA));
return false;
}
}

bool CMnistReader::GetNextLabel(LABEL_DATA lb)
{
if (m_type == LABEL &&
(m_lpMapAddress + m_dwFileSize - m_lpCurAddress) >= sizeof(LABEL_DATA))
{
memcpy(lb, m_lpCurAddress, sizeof(LABEL_DATA));
m_lpCurAddress += sizeof(LABEL_DATA);
return true;
}
else
{
memset(lb, 0xff, sizeof(LABEL_DATA));
return false;
}
}

bool CMnistReader::GetPrevImage(IMAGE_DATA img)
{
if (m_type == IMAGE &&
(m_lpCurAddress - sizeof(IMAGE_DATA)) >=
(m_lpMapAddress + offsetof(MNIST_IMAGE, data)))
{
m_lpCurAddress -= sizeof(IMAGE_DATA);
memcpy(img, m_lpCurAddress, sizeof(IMAGE_DATA));
return true;
}
else
{
memset(img, 0, sizeof(IMAGE_DATA));
return false;
}
}

bool CMnistReader::GetPrevLabel(LABEL_DATA lb)
{
if (m_type == LABEL &&
(m_lpCurAddress - sizeof(LABEL_DATA)) >=
(m_lpMapAddress + offsetof(MNIST_LABEL, label)))
{
m_lpCurAddress -= sizeof(LABEL_DATA);
memcpy(lb, m_lpCurAddress, sizeof(LABEL_DATA));
return true;
}
else
{
memset(lb, 0xff, sizeof(LABEL_DATA));
return false;
}
}

bool CMnistReader::GetImage(IMAGE_DATA img, int idx)
{
    // Not implemented
return false;
}

bool CMnistReader::GetLabel(LABEL_DATA lb, int idx)
{
// Not implemented
return false;
}

CBitmapConverter::CBitmapConverter(HDC hdc)
{
BITMAPINFO bi;
ZeroMemory(&bi, sizeof(BITMAPINFO));
bi.bmiHeader.biSize = sizeof(BITMAPINFOHEADER);
bi.bmiHeader.biWidth = IMAGE_WIDTH;
bi.bmiHeader.biHeight = -IMAGE_HEIGHT;
bi.bmiHeader.biPlanes = 1;
bi.bmiHeader.biBitCount = 8;
bi.bmiHeader.biCompression = BI_RGB;

m_hBitmap = CreateDIBSection(hdc, &bi, DIB_RGB_COLORS, (VOID**)&m_lpBitmapBits, NULL, 0);
}

CBitmapConverter::~CBitmapConverter()
{
if (m_hBitmap)
DeleteObject(m_hBitmap);
}

bool CBitmapConverter::Convert(IMAGE_DATA data)
{
unsigned char* lpBitmapBits = m_lpBitmapBits;

#define ALIGN(x,a)              __ALIGN_MASK(x, a-1)
#define __ALIGN_MASK(x,mask)    (((x)+(mask))&~(mask))
int width = IMAGE_WIDTH;
int pitch = ALIGN(width, 4);
#undef __ALIGN_MASK
#undef ALIGN

for (int i = 0; i < IMAGE_HEIGHT; i++)
{
unsigned char* v = data[i];
memcpy(lpBitmapBits, v, width);
lpBitmapBits += pitch;
}

return true;
}


The running result:


Wednesday, October 26, 2016

Linear Regression with TensorFlow

If you don't know the concept of Linear Regression, please turn to the course of Machine Learning lectured by Andrew Ng. There's a dedicated Unit about it. I use the data from the corresponding exercise for coding here. The next material I consulted intensively is TensorFlow for Machine Intelligence. I have no intention to infringe the copyright. So any praise and further permission go to them if you consider use the code pasted here for commercial purpose.

The code is just as follows, I would think it's self-explained so I purposely avoid any further explanation. However comments are welcome and probably I will refine it later:


import numpy as np
import tensorflow as tf
from matplotlib import pyplot as plt
from matplotlib import style
import cPickle as pickle
import os


# global scope
style.use('ggplot')

trained = False

W = tf.Variable(tf.random_normal([1, 1], mean = 1.0, stddev = 0.5, dtype = tf.float64), name="weights")
b = tf.Variable(0.0, dtype = tf.float64, name="bias")

sess = tf.Session()

def loadData(fileName):
    if not os.path.exists(fileName):
        print("Non-exist file %s" % fileName)
        exit()

    dataSet = []
    baseName = os.path.basename(fileName)
    extName = baseName + '.pkl'
    objFileName = os.path.join(os.path.dirname(fileName), extName)
    if os.path.exists(objFileName):
        with open(objFileName) as f:
            dataSet = pickle.load(f)
    else:
        with open(fileName) as f:
            for l in f.readlines():
                cont = l.strip().split(',')
                data = map(float, cont)
                dataSet.append(data)
        with open(objFileName, 'wb') as f:
            pickle.dump(dataSet, f, True)

    return dataSet

def dispData(dataSet):
    dataMat = np.mat(dataSet)
    x = dataMat[:, 0]
    Y = dataMat[:, 1]

    plt.scatter(x, Y)

    plt.xlabel('X axis')
    plt.ylabel('Y axis')

    plt.show()

def calc(X):
    return tf.matmul(X, W) + b

def train(fileName = 'ex1data1.txt', trainSteps = 1000):
    global trained

    trained = True

    def inputs(fileName):
        dataSet = loadData(fileName)
        dataMat = np.mat(dataSet)
        X = dataMat[:, :-1]
        Y = dataMat[:, -1]
        return X, Y

    def loss(X, Y):
        Y_ = calc(X)
        return tf.reduce_mean(tf.squared_difference(Y, Y_))

    learningRate = 0.01
    def trainHelper(totalLoss):
        return tf.train.GradientDescentOptimizer(learningRate).minimize(totalLoss)

    sess.run(tf.initialize_all_variables())

    X, Y = inputs(fileName)
    totalLoss = loss(X, Y)

    trainOp = trainHelper(totalLoss)

    coord = tf.train.Coordinator()
    threads = tf.train.start_queue_runners(sess = sess, coord = coord)
    
    for step in range(trainSteps):
        sess.run([trainOp])
        # print("loss is ", totalLoss.eval(session = sess))

    coord.request_stop()
    coord.join(threads)

    # should save the model

def inference(x):
    global trained

    if trained == False:
        train()
    
    ret = sess.run(calc(x))
    return ret

def plotRegLine(dataSet):
    dataMat = np.mat(dataSet)
    X = dataMat[:, :-1]
    Y = dataMat[:, -1]

    dotsX = np.vstack((min(X), max(X)))
    dotsY = sess.run(calc(dotsX))

    plt.scatter(X, Y)
    plt.plot(dotsX, dotsY)

    plt.xlabel('X axis')
    plt.ylabel('Y axis')

    plt.show()


if __name__ == '__main__':
    dataSet = loadData('ex1data1.txt')
    # dispData(dataSet)
    # print inference(tf.to_double([[10.0]]))
    train()
    plotRegLine(dataSet)

    sess.close()


Here is the figure:


Sunday, October 23, 2016

A formula in Conditional Probability

I am sorry that I am not quite familiar with Latex, so all the mathematical formula texted here is ugly.

A formula related to conditional probability is sometimes overlooked however sometimes it's quite convenient to use it. The equation is
P(A, B | C) = P(A | B, C) * P(B | C) (1)

The proof is direct, since
P(A, B | C) = P(A, B, C) / P(C) (2)

and
P(A | B, C) = P(A, B, C) / P(B, C) (3)
P(B | C) = P(B, C) / P(C) (4)

Multiply the right sides of both (3) and (4) will lead to the right side of (2), so the formula holds


Saturday, October 1, 2016

How to build and test new Op in TensorFlow

I would think install TensorFlow from source code would be a benefit. However if one didn't do so, how can one build and test the new Op in TensorFlow?

For building the Op just with binary installed, just write a simple Makefile in the directory where source code resides, and put the following content into it:

TF_INC=$(shell python -c "from tensorflow import sysconfig; print(sysconfig.get_include())")
all:
g++ -std=c++11 -shared foo_bar.cc -o foo_bar.so -fPIC -I ${TF_INC} -D_GLIBCXX_USE_CXX11_ABI=0


For testing, just write the following Python script:

import tensorflow as tf
import unittest

def test():

    class FooBarTest(unittest.TestCase):
        def testFooBar(self):
            foo_bar_module = tf.load_op_library('/directory/to/foo_bar.so')
            with tf.Session():
                result = foo_bar_module.foo_bar([1, 2, 3])
                self.assertListEqual(result.eval().tolist(), [1, 2, 3])
    suite = unittest.TestSuite()
    for test_name in ['testFooBar']:
        suite.addTest(FooBarTest(test_name))
    unittest.TextTestRunner(verbosity = 2).run(suite)

if __name__ == '__main__':
    test()
    

Enjoy the hacking!

Tuesday, September 20, 2016

Commands for setting wireless hosted network on Windows 10

Sometimes it's convenient to setup a wireless hosted network on Windows, especially without a soft AP. When living or going to some countries with Internet access restriction, it's convenient to setup a VPN connection, then setup a hosted network to share the Internet connection of VPN.

Following are commands to ease such a task.

First is to create the hosted network:

netsh wlan set hostednetwork mode=allow ssid=Your-SSID key="Your-Password"
netsh wlan start hostednetwork

Then do the sharing:

One can inspect the status of the hosted network via the following command:
netsh wlan show hostednetwork
or
netsh wlan show hostednetwork setting=security

If after some time, not necessary to continue the host network, the following command can stop it:
netsh wlan stop hostednetwork

If one wants to alter the password, for instance, you forget the original one, utilizing the following command:
netsh wlan set hostednetwork key="Your-New-Password"
netsh wlan refresh hostednetwork key

The SSID can be changed as well:
netsh wlan set hostednetwork ssid="Your-New-SSID"

Happy networking, happy surfing!


Monday, September 19, 2016

How to use TensorFlow on Windows via Docker

The support of Docker on Windows comes in two flavors. For native support, some version of Windows is required and it's still maturing, I would confess Hyper-V is a nice thing from the native Windows perspective, however it's too greedy on Memory. So for me just focus on Docker toolbox for Windows.

Before we begin, let's have a look at the architecture of Docker working principle on Windows, referring to the following figure[1]:


So general speaking, the host contained in a image called boot2docker which is running in a virtual machine (here it's called "default" running in VirtualBox). Docker daemon and any other containers run within the host.
So when manipulate with the command docker-machine, generally the parameter is always default, for example:
docker-machine start default
docker-machine stop default


After click the "Docker Quickstart Terminal", after a while for preparation (create the default virtual machine running in VirtualBox for the first time; or bring it to life if it's already exist. and start the deamon and communicate with it):


The host can be accessed by the pre-configured ssh setting:

Just typing ssh docker@127.0.0.1 -p 1939. The password is tcuser.

Here we can inspect some interesting settings.
1. The docker toolbox will create a host-only network interface for the "default" running instance:

It will be functioning at least to layer 3, so it gets an IP address, usually it's 192.168.99.1 from outside.
2. When you inspect inside from docker, it's quite interesting:
I know eth1 is corresponded to the newly create host-only network, to my understanding, the host-only network interface can be shared by many instances, so each should has their own specific IP address, so here it's 192.168.99.100

Notice the docker_gwbridge, as it name reflects, it's a bridge built on top of eth1. I guess it's got a IP address range 172.18.0.0/16 just for the flexibility. There's potentiality for existence of more such bridges.

Another interface docker0 is actually connected to this bridge. If you run more containers, one can guess that the virtual interface is also connected to docker_gwbridge, with IP addresses from 172.17.0.0/16.

Once such networking topology is made clear, it can ease some confusing problems.

For example, it's quite common for one runs container first then realize that export some port for external access is unavoidable. For example, if we just run the following command:
docker run --name tensorflow -it gcr.io/tensorflow/tensorflow:latest-devel
we will find later we cannot access TensorBoard, which is listening on the following address: 0.0.0.0:6006.

So one way is to remove the existing tensorflow container, and explicitly publish the port-mapping on creating:
docker rm tensorflow
docker run -p 6006:6006 --name tensorflow -it gcr.io/tensorflow/tensorflow:latest-devel

Another way is enter docker host, and manipulate the iptables (I guess it works, but I haven't try):


The command working with common container is simple, for example, start and stop a container:
docker stop tensorflow
docker start -ai tensorflow
In the above command, it's necessary to temporarily redirect stdin, stdout and stderr to the current terminal for convenience.


Once start a tensorflow docker instance, the following is just happy hacking!